This article demonstrates how to create, configure, and send postback buttons to a Facebook Page via Facebook Messenger using Quickwork.
What you'll need:
Skill level: Intermediate
Time required: 10 minutes
- Journeys:
-
- To send the postback buttons
- To define the block and the logic
-
- Triggers:
-
- Facebook Messenger - New text message: To trigger the first journey
- Facebook Messenger - New Postback message: To create a block and execute the logic defined in the second journey
-
- Actions:
- Facebook Messenger - Send button template: To send buttons to a Facebook Page
- Weather Source - Get forecast data: To fetch the weather forecast details
- Facebook Messenger - Send message: To send the forecast details to the Facebook Page when a button is clicked
- Facebook Messenger Android/iOS app
- A page on Facebook
- A block to call the actions upon clicking the postback button
What is a postback button?
A postback button, when tapped, invokes the actions configured in the other journey. It then performs the complete execution as per the logic defined within the actions of that journey.
Usecase
Display the weather forecast information of Mumbai, New Delhi, and Hyderabad whenever a user clicks the associated postback buttons sent to a Facebook Page.
Creating the first journey
Let's create the following three postback buttons clicking which the user gets the appropriate information:
MumbaiNew DelhiHyderabad
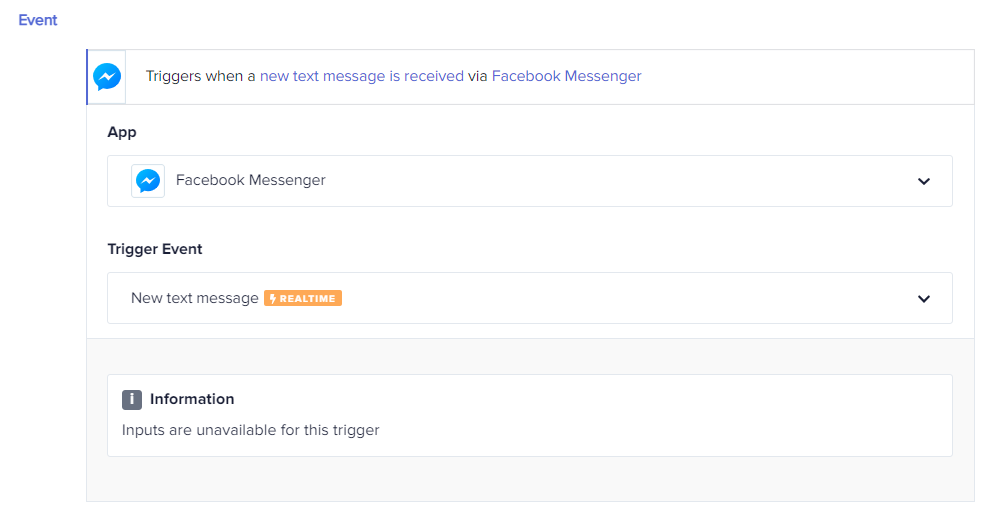
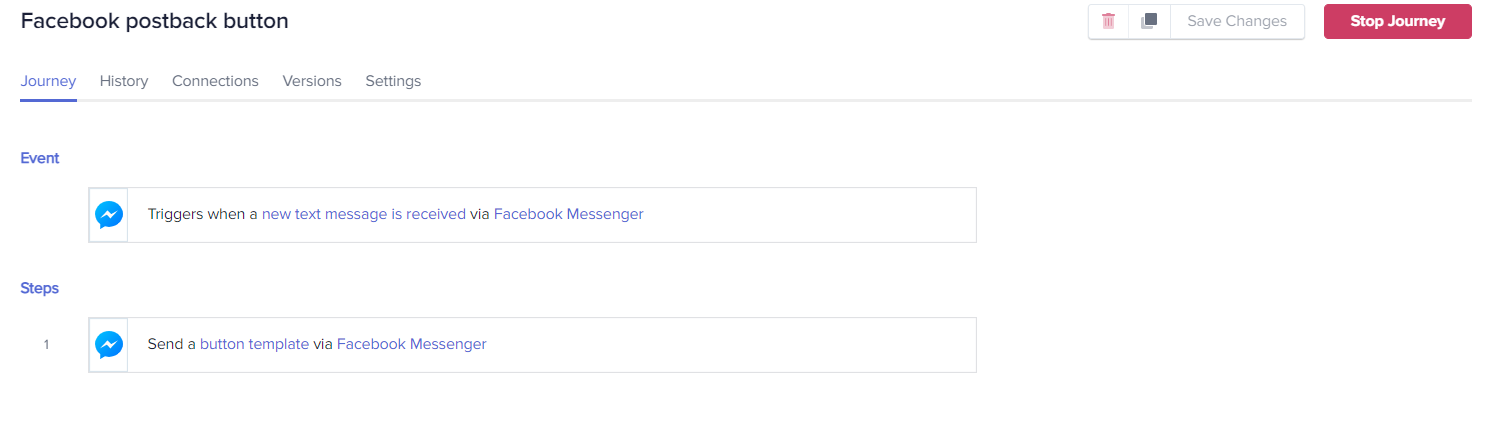
Configuring the trigger
- Under the Event section, choose the Facebook Messenger app from the drop-down menu in the Apps list present right below the New Trigger button.
- Select the trigger event, New text message, from the drop-down menu in the Triggers list.
- Click the Link an account button to connect to a Facebook Page. You'll need a Page ID to connect it with Quickwork. Click here to know how to connect:
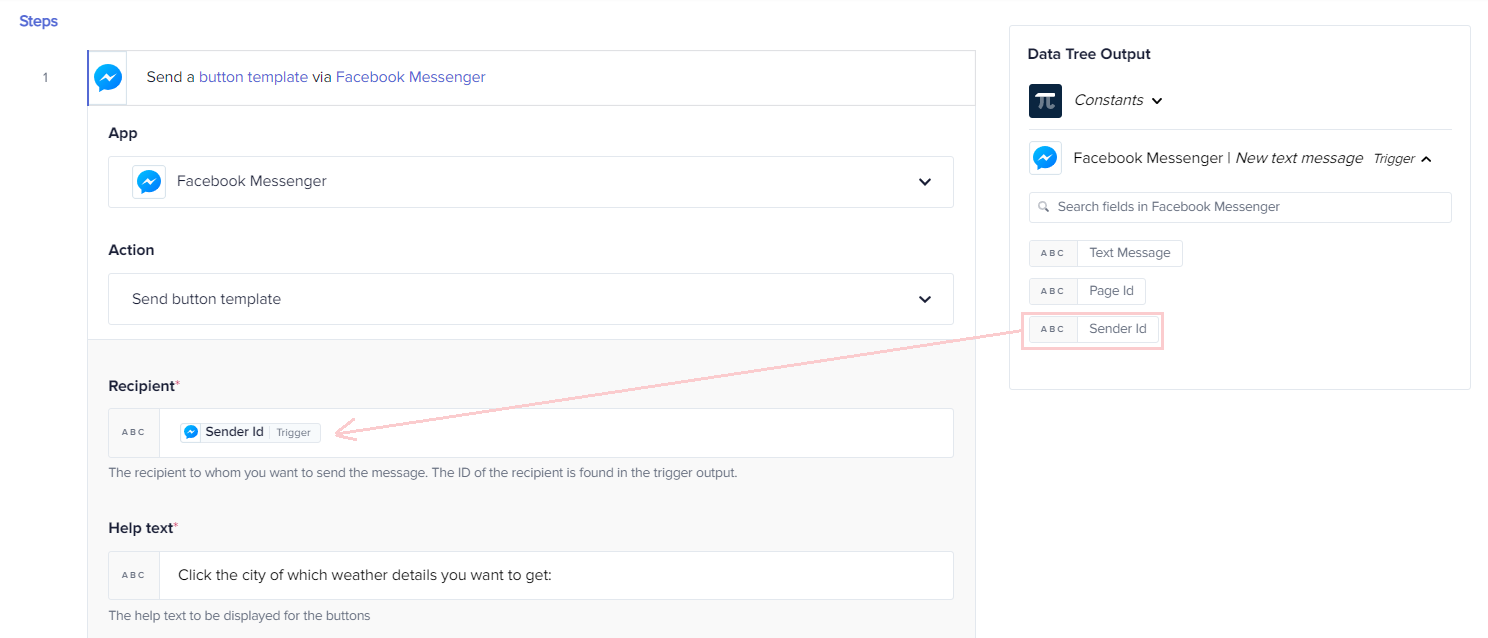
Configuring the action
- Under the Steps section, click on the Simple Action button, and choose the Facebook Messenger app from the drop-down menu in the Apps list.
- Select the Send button template action from the drop-down menu in the Actions list.
- The same Facebook Page will get connected automatically with Quickwork and the associated input fields will open.
- In the Recipient field, drag and drop the
Sender IDdata pill from Facebook Messenger | New text message Trigger under Data Tree Output. Sender ID is not a static ID of an account. It is a unique dynamic ID of each person sending a message to the Facebook Page. - In the Help text field, enter the message you want to send to your Facebook Page. E.g., Click the city of which weather details you want to get:
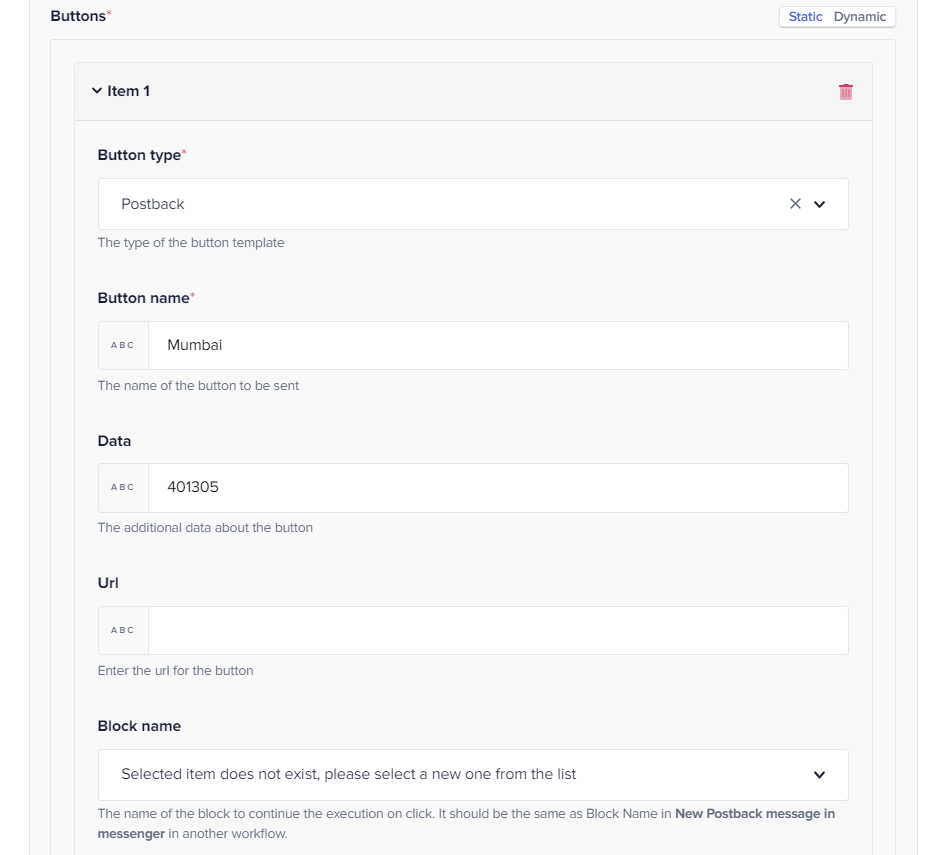
- Now, let's start adding the postback buttons. To do this, scroll down to the Buttons section. In the Button type field under the Item object, select Postback.
- Enter Mumbai in the Button name field. In the Data field, enter the pin code of any area located in the Mumbai region. E.g., 401305. This is the callback data that will be called in the second journey and will extract all the information related to Mumbai's weather conditions.
- Leave the Url field empty since we are using the postback method.
- In the Block name field, select the name of the block that the postback button should call once clicked. Currently, this will be empty as we are yet to create the block:
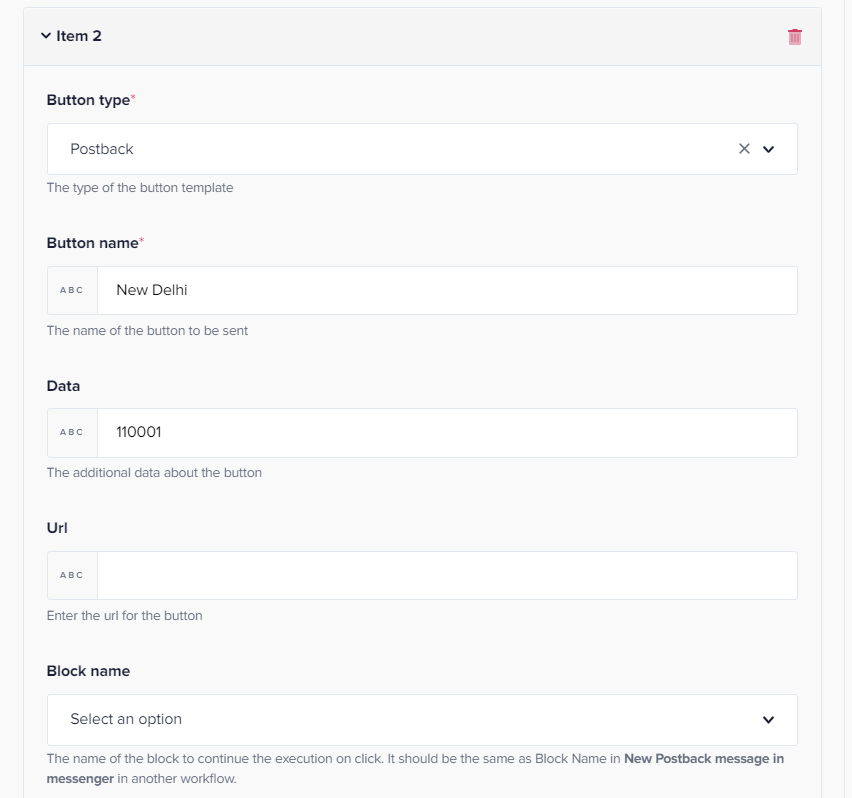
- Now, click the Add New Item button to add another postback button. In the Button type field under the Item object, select Postback.
- Enter New Delhi in the Button name field. In the Data field, enter the pin code of any area located in the New Delhi region. E.g., 110001.
- Leave the Url field empty since we are using the postback method.
- In the Block name field, select the name of the block that the postback button should call once clicked. Currently, this will be empty as we are yet to create the block:
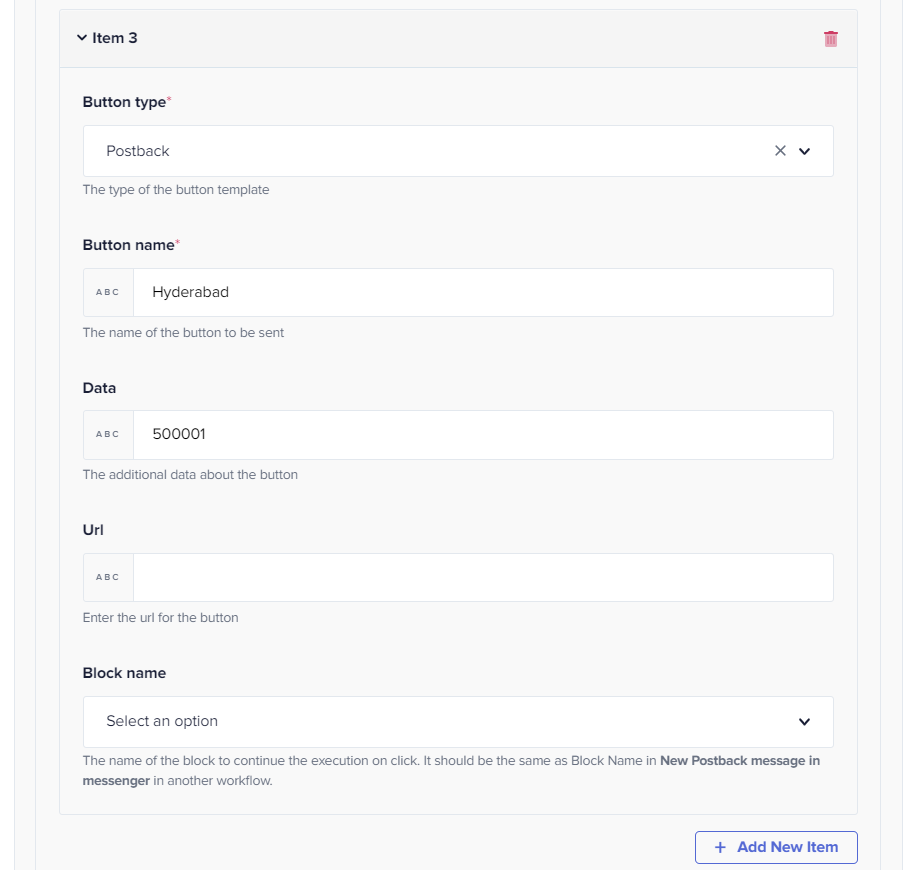
- Now, click the Add New Item button to create the third postback button. The Item 3 block will appear. In the Button type field under the Item object, select Postback.
- Enter Hyderabad in the Button name field. In the Data field, enter the pin code of any area located in the New Delhi region. E.g., 110001.
- Leave the Url field empty since we are using the postback method.
- In the Block name field, select the name of the block that the postback button should call once clicked. Currently, this will be empty as we are yet to create the block:
In this way, we have successfully configured the first journey with three postback buttons. Save the changes. However, we are yet to define the block name.
Note: You can configure up to three postback buttons in one template. Learn more.
Configuring the second journey
Now, let's create a second journey to configure the block name and build logic that should be called when any of the postback buttons is clicked.
Configuring the trigger
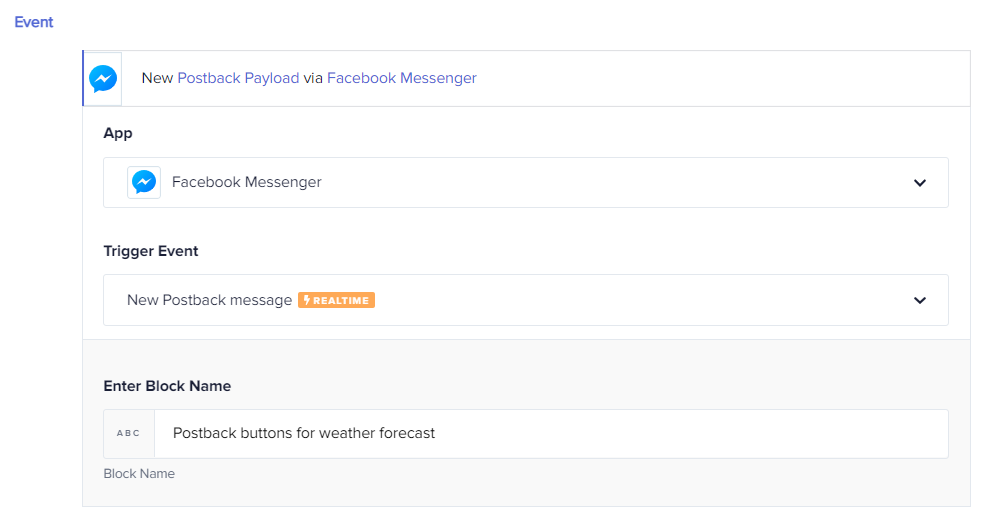
- Under the Event section, choose the Facebook Page app from the drop-down menu in the Apps list present right below the New Trigger button.
- Select the trigger event, New Postback message, from the drop-down menu in the Triggers list.
- Select the existing Facebook Page connection and click the Link account button. The same Facebook Page, connected in the first journey, will get connected successfully.
- Enter the name of the block in the Block Name field. E.g., Postback buttons for weather forecast:
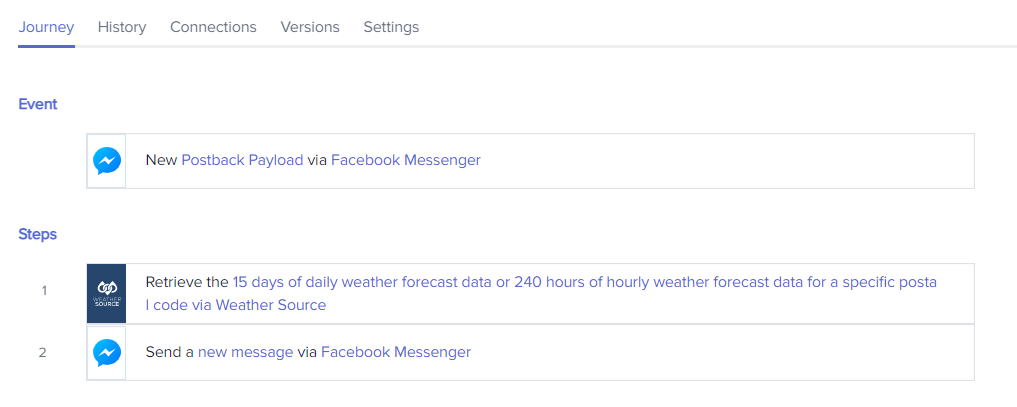
Configuring the Get forecast data action
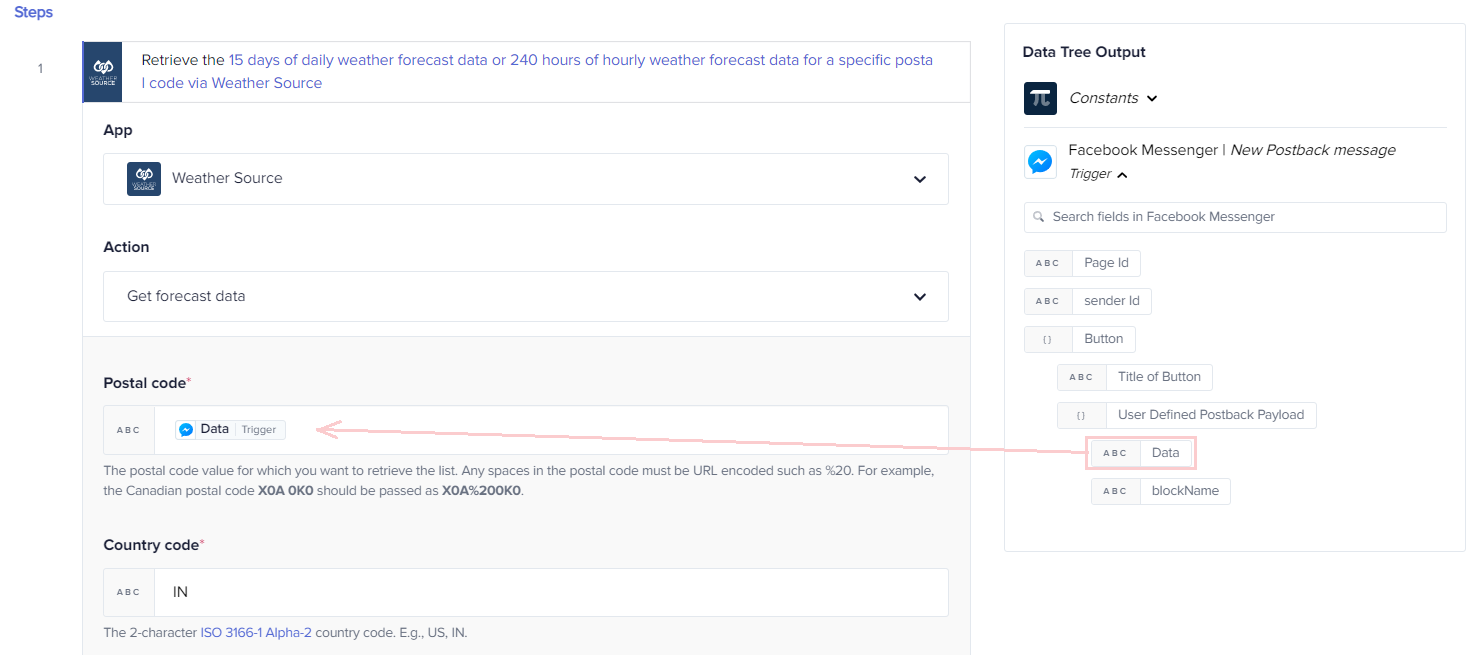
- Under the Steps section, click on the Simple Action button and choose the Weather Source app from the drop-down menu in the Apps field.
- Select the action, Get forecast data, from the drop-down menu in the Actions list.
- Click the Link an account button. The Connect to Weather Source window will appear. Enter the API key to get connected. Click here to know how to connect.
- In the Postal code input field, drag and drop the
Datadata pill from the Facebook Messenger | New text message Trigger under Data Tree Output. TheseDatadata pill contains the pin codes we defined in the Data input field of the first journey. - Specify the county code as IN for India in the Country code field. Keep the Period field empty:
Configuring the Send message action
- Click the Add a step button (+ icon), click on the Simple Action button, and choose the Facebook Messenger app from the drop-down menu in the Apps list.
- Select the Send message action from the drop-down menu in the Actions list.
- By default, the same Facebook Page will get connected automatically. Upon successful connection establishment, the input fields will open.
- Select Response as Message type. In the Recipient field, drag and drop the
sender IDdata pill from Facebook Messenger | New Postback message Trigger under Data Tree Output: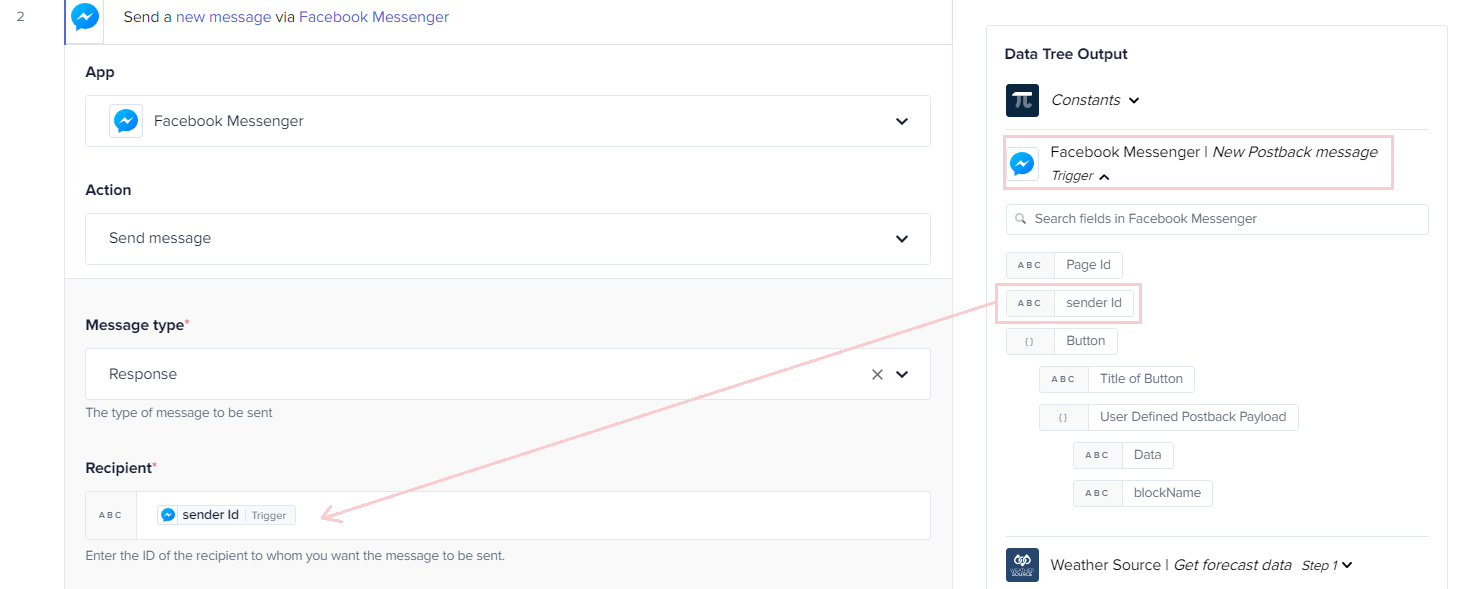
- Now, let's configure to display appropriate messages on Facebook Page when a user clicks any on the postback buttons. To do so, drag and drop the following data pills from the Weather Source | Get forecast data under Data Tree Output:
Postal CodeTemp AvgHeat Index AvgFeels Like AvgWind Chill Avg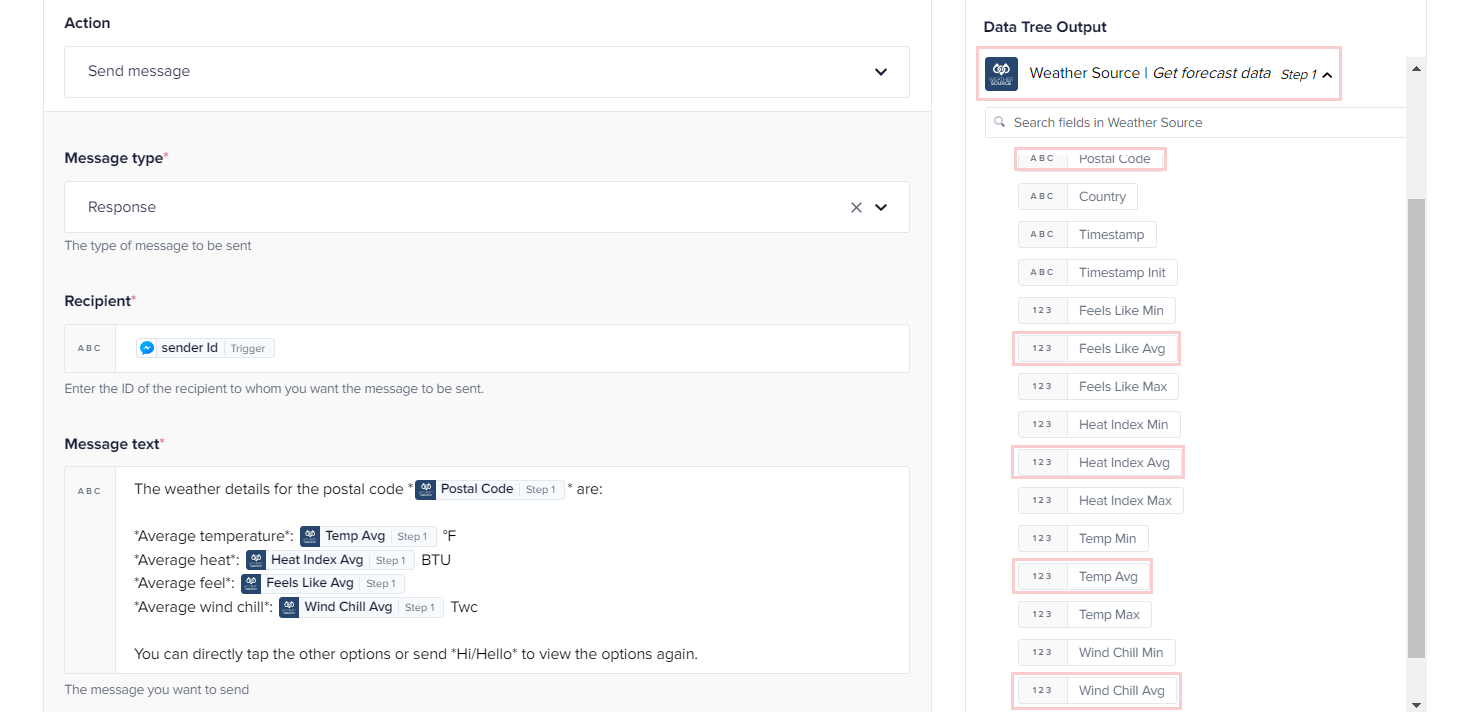
Note: The message text including data pills should not exceed by 2000-character limit.
- Format appropriately as shown in the above screenshot.
- Now save the changes and start this journey:
Selecting the block name
Now, return to the Send button template action of the first journey. Scroll down to the Block name input field. You can now see the block name in the drop-down menu:

Select the same for all three postback buttons and start this journey:
Note: To get the block name in the drop-down menu, the associated block name journey must be in the execution state else no name will be reflected.
Executing the journey
Now, whenever you or a person sends a message to your Facebook Page, say Hello, the three postback buttons will pop up. Clicking them will give you the weather forecast information. Refer to the following GIF for a better understanding of journeys' execution:

In this way, you can create numerous postback buttons of your choice and associate them with logic as per your business requirement.
Hence, we have successfully implemented the function of the postback buttons in a Facebook Page.
Comments
0 comments
Please sign in to leave a comment.