This article demonstrates configuring and sending a postback button to a specific Slack channel using Quickwork.
What you'll need:
Skill level: Intermediate
Time required: 7 minutes
- Journeys:
-
- To trigger the journey
- To define a block and logic
-
- Triggers:
-
- Scheduler by Quickwork - New scheduled event: To trigger the first journey
- Slack - Button click trigger: To create a block and execute the logic of the second journey
-
- Actions:
- Slack - Send message on button click: To send a button to a Slack channel
- Google Sheets - Add row: To store user information
- Slack - Send message to a channel: To notify when a button is clicked
- A channel in your Slack account
- A block to call the actions upon clicking the postback button
What is a postback button
A postback button, when tapped, invokes the actions configured in the other journey. It then performs the complete execution as per the logic defined within the actions of the other journey.
Usecase
Save the user information automatically to a spreadsheet when a user clicks a postback button sent to a specific Slack channel.
Creating the first journey
Let's create the Add data postback button clicking which the user data gets stored automatically.
Configuring the trigger
- Under the Trigger section, choose the Scheduler by Quickwork app from the drop-down menu in the Apps list present right below the New Trigger button.
- Select the trigger event, New scheduled event, from the drop-down menu in the Triggers list.
- Set the Interval as per your choice based on how often you want the journey to be executed. E.g., 15 seconds.
- Set the date and time of your choice in the Start At field and keep the Custom Payload field empty:

Configuring the action
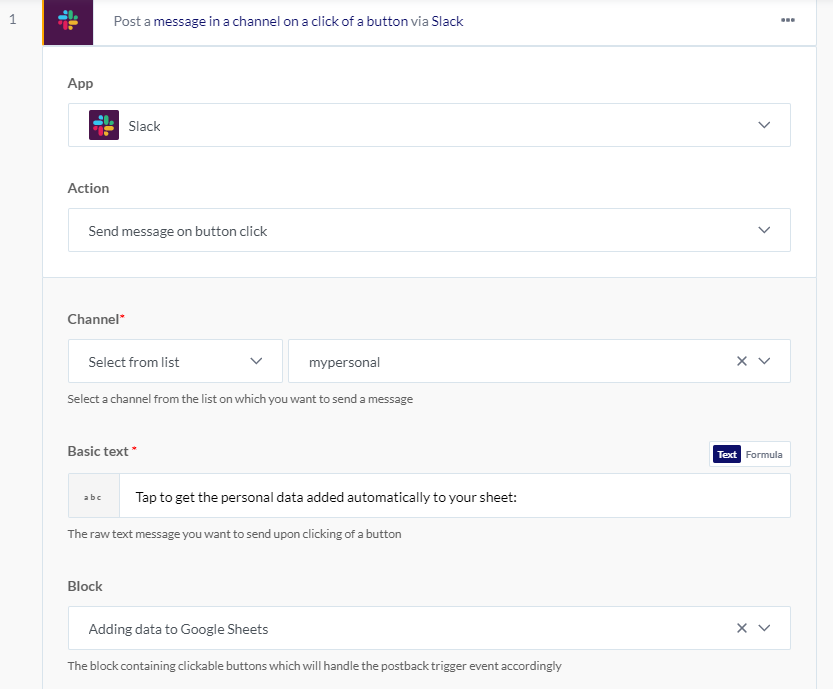
- Under the Steps section, click on the Simple Action button and choose the Slack app from the drop-down menu in the Apps field.
- Select the Send message on button click action from the drop-down menu in the Actions field.
- Click the Link an account button to establish a new slack connection. By allowing the permissions, your Slack account gets connected successfully.
- Upon successful connection establishment, the input fields will open.
- In the Channel input field, select the channel to which you want to send the buttons. E.g., mypersonal.
- In the Basic text field, enter the information you want to associate with the URL buttons. E.g., Tap to get the personal data added automatically to your sheet:
- In the Block field, select the block name that has the actions configured in it. Currently, you won't get any drop-down options as we are yet to create a block.
- The Attachment title and Attachment title link field is used for configuring the URL button. Click here to know more. Leave these fields empty.
- Now, scroll down to the Buttons object. In the Name field, specify the name of the button. E.g., Add data. In the Value field, specify unique random data as a note to yourself. This is not visible to the user:
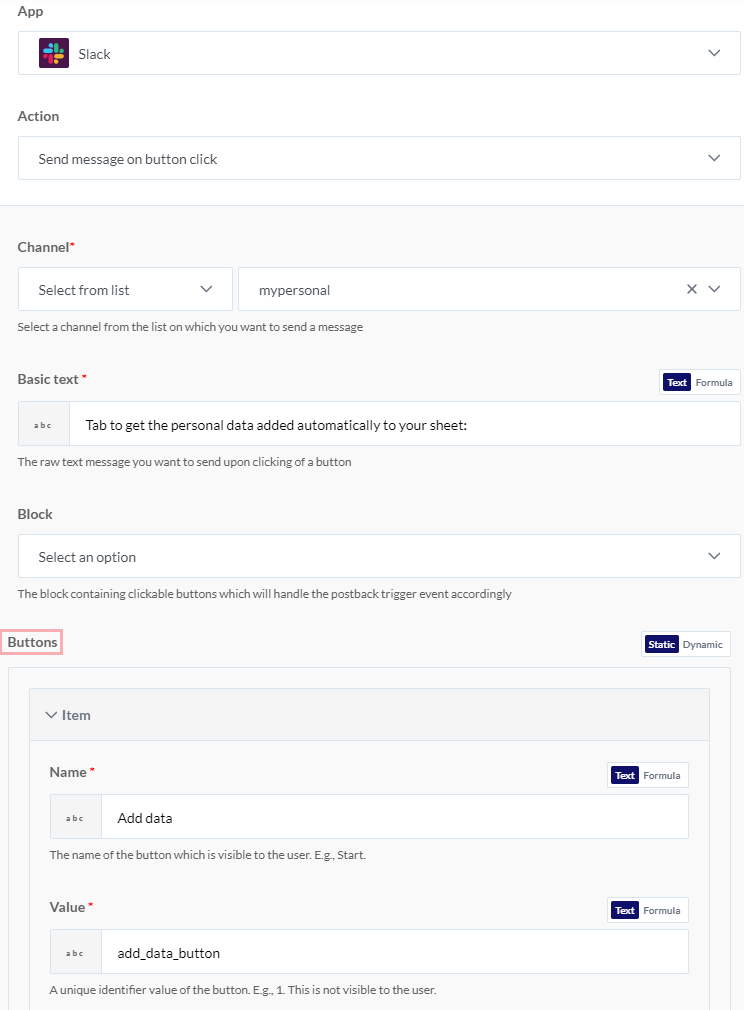
- Keep other input fields empty and save the journey.
Configuring the second journey
Let's create a block name and configure the Add row and Send message to a channel action. This will store the data and notify the user on the channel at the same time.
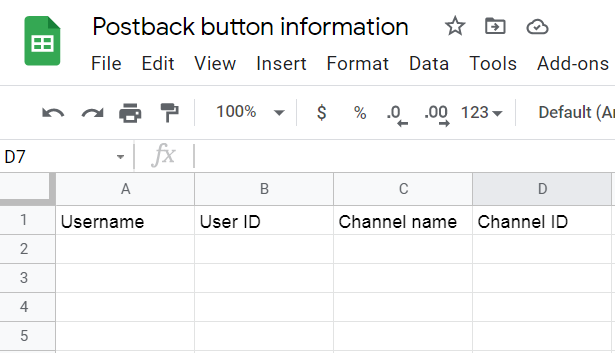
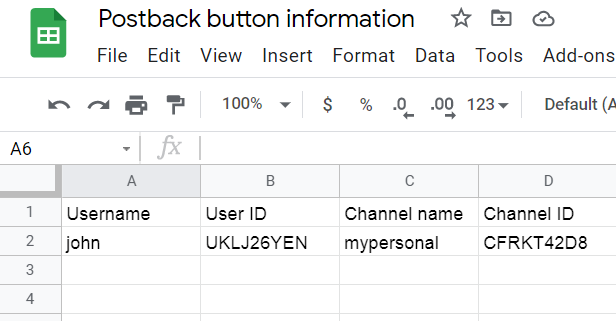
Create a Google Sheet named Postback button information with the following four column headings before creating the journey:
- Username
- User ID
- Channel name
- Channel ID
Configuring the trigger
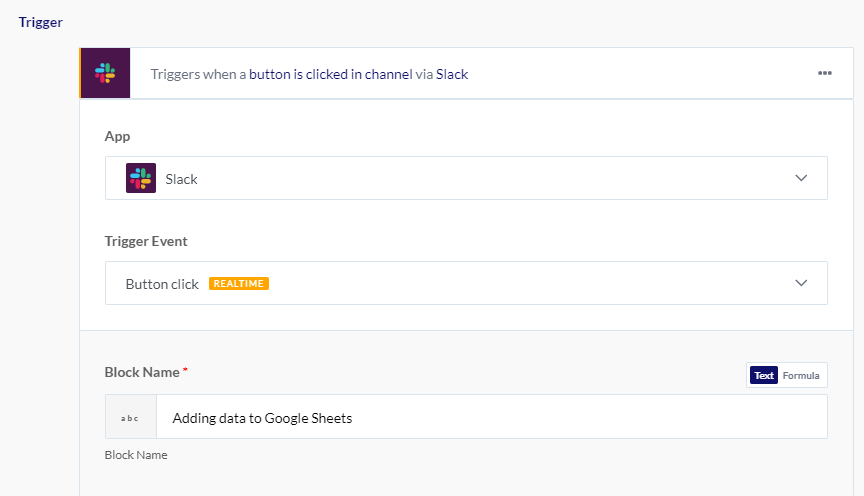
- Under the Trigger section, choose the Slack app from the drop-down menu in the Apps list present right below the New Trigger button.
- Select the trigger event, Button click, from the drop-down menu in the Triggers field.
- Select the existing Slack connection that you have connected to in the above journey. Connecting a different Slack account won't execute this journey.
- Upon successful connection establishment, the input field will open.
- In the Block Name field, enter the name of the block. E.g., Adding data to Google Sheets:
Configuring the Add row action
- Under the Steps section, click on the Simple Action button and choose the Google Sheets app from the drop-down menu in the Apps list.
- Select the Add row (new version) action from the drop-down menu in the Actions list.
- Click the Link an account button to establish a new Google Sheets connection in which you have created the Postback button information sheet. By allowing the permissions, your Google Sheets account gets connected successfully.
- Upon successful connection establishment, the input fields will open.
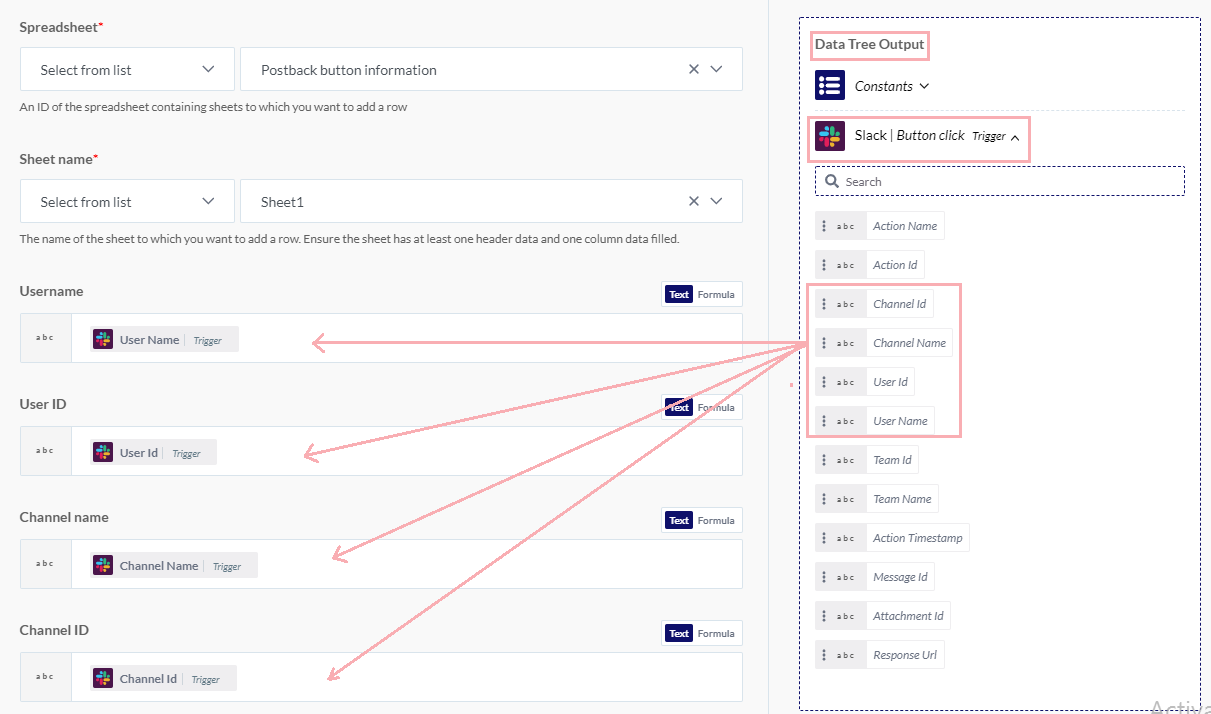
- Select the Spreadsheet from the drop-down menu.
- Select the Sheet to which you want to store the user data.
- The column headers appear automatically as input fields.
- From the Slack | Button click Trigger under Data Tree Output, click the appropriate data pills to parse them to the associated input fields as shown here:
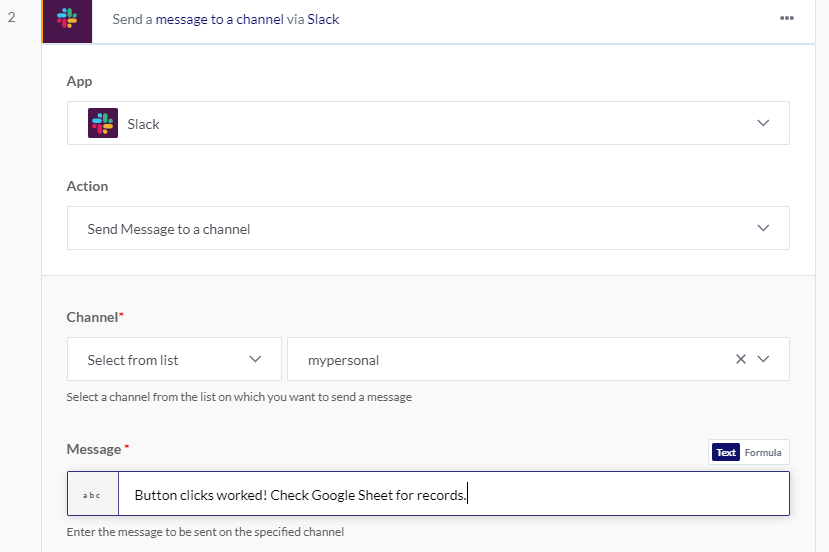
Configuring the Send message to a channel action
- Click the Add a step button (+ icon), click on the Simple Action button and choose the Slack app from the drop-down menu in the Apps list.
- Select the Send message to a channel action from the drop-down menu in the Actions field.
- The same Slack account will get connected automatically.
- Upon successful connection establishment, the input fields will open.
- In the Channel input field, select the channel to which you want to send the buttons. E.g., mypersonal.
- Specify the notification message to be displayed upon clicking the button in the Message field. E.g., Button clicks worked! Check Google Sheet for records.
- Leave the other input fields empty:
- Now save the changes and start this journey.
Selecting the block name
Now, return to the Send message on button click action of the first journey. In the Block input field, you can now see the block name in the drop-down menu. Select it and start this journey:
Executing the journey
Once both the journeys are in the execution state, go to your Slack channel. You can see the postback button with the associated text:

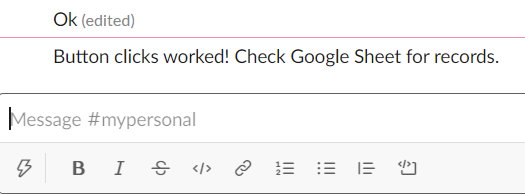
Now, click the Add data button. You'll get the notification message:
Now, take a look at your Google Sheet. The information has been captured successfully:
In this way, you can create numerous postback buttons of your choice and associate them with logic as per your business requirement.
Comments
0 comments
Please sign in to leave a comment.